
Navigating the holiday season often brings the delightful challenge of potlucks and festive dinners, but it shouldn’t come with a side of stress or a hefty price tag. This guide provides eight improvisational, budget-conscious, and stress-free holiday side dish recipes, complete with Smartly twists for potlucks and festive gatherings.
The Holiday Hustle: When My Potluck Plans Went Sideways
I still laugh (and cringe a little!) remembering the year I decided to host a “Holiday Feast of Epic Proportions” – entirely by myself. The kitchen was a battlefield of flour, half-chopped vegetables, and too many simmering pots, while my living room felt like a staging area for a culinary marathon. I’d promised a friend a gluten-free dessert, and while my ultimate moist gluten-free cake always turns out wonderfully, managing that alongside three complex sides, a main, and appetizers? It was a beautiful, chaotic mess. My guests, bless their hearts, arrived to find me covered in cranberry sauce, a little frazzled, but laughing through it all. That day taught me a vital lesson: holiday cooking should be about joy and connection, not perfection and exhaustion.
The Potluck Predicament: Impress Without the Fuss
We’ve all been there, right? The invite to a holiday potluck lands, and suddenly you’re picturing Martha Stewart-level dishes, feeling the pressure to impress, or worrying about the grocery bill. The thought of adding another complicated dish to an already packed holiday schedule can feel daunting. There’s a subtle pressure to prove your culinary prowess, but what if we shifted our focus? What if the goal was simply delicious, comforting food that made everyone feel welcome and celebrated, without breaking the bank or your spirit?
Smartly’s Philosophy: Joy Over Juggling
Here at Smartly Recipes, we believe food is a celebration. It’s about gathering around a table, sharing stories, and savoring flavors that warm the soul. My own kitchen is often a hub for friends and family, and I’ve learned that the most cherished moments often come from simple, honest food made with love. My passion for exploring local farmers’ markets means I’m always looking for seasonal gems that transform into budget-friendly masterpieces. These recipes are designed to bring that philosophy to your holiday table: maximum flavor, minimal fuss, and absolutely no financial acrobatics required.
Why Budget-Friendly & Easy Sides Are a Holiday Lifesaver
Choosing budget-friendly and easy-to-prepare sides isn’t a compromise; it’s a smart strategy for a truly joyful holiday. Think about it: fewer grocery trips, less time at the stove, and more moments spent laughing with loved ones or simply enjoying a quiet cup of coffee. This approach frees up both your wallet and your precious holiday hours, allowing you to focus on what truly matters.
Smart Choices That Don’t Compromise Flavor
When we talk about “budget-friendly,” we’re not talking about cutting corners on taste. Instead, it’s about making clever choices: leveraging seasonal produce that’s naturally more affordable, embracing pantry staples, and using simple techniques that coax incredible flavor from humble ingredients. It’s about finding that sweet spot where affordability meets deliciousness, creating dishes that taste like a million bucks without the associated cost.
Prep-Ahead Powerhouses & Last-Minute Wonders
The beauty of these recipes lies in their flexibility. Many can be prepped partially or entirely in advance, making your holiday a breeze. Imagine simply pulling a dish from the fridge and popping it into the oven on the big day! Others are quick enough to whip up just before serving, making them ideal “last-minute wonders” when you realize you need one more something. This kind of flexibility is a game-changer for holiday hosts and potluck attendees alike.
Crowd-Pleasing Versatility for Every Palate
From the pickiest eaters to the most adventurous palates, these sides offer something for everyone. They’re comforting, familiar, yet each boasts a little Smartly twist that elevates them beyond the ordinary. Plus, many are easily adaptable to different dietary needs, ensuring all your guests feel included and well-fed.
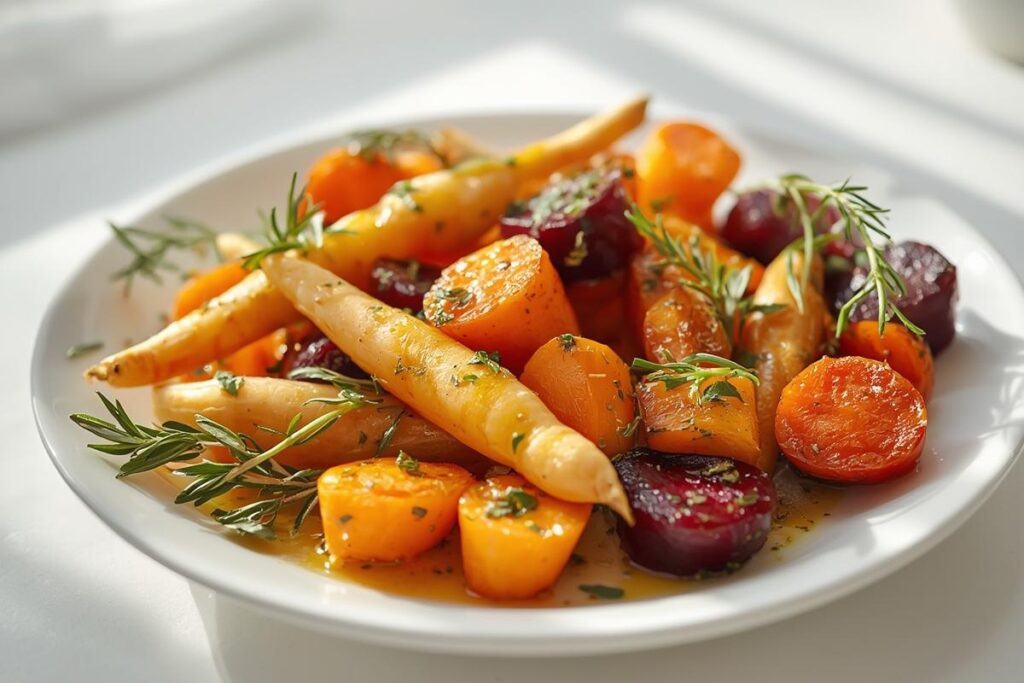
Golden Roasted Roots with Zesty Herb Vinaigrette
Why It’s a Holiday Hero
There’s nothing quite like a platter of vibrant, caramelized root vegetables to brighten a holiday table. This dish is not only stunning but incredibly simple to make and surprisingly budget-friendly. Roasting brings out their natural sweetness, and the zesty vinaigrette adds a fresh, bright counterpoint.
Smartly Savings: Ingredient Swaps & Stretching
Embrace whatever root vegetables look best at your local market! Carrots, parsnips, sweet potatoes, and beets are excellent choices. I often toss in some red onion wedges too. Don’t have fresh herbs for the vinaigrette? A teaspoon of dried mixed herbs will still add lovely flavor. If you’re short on olive oil, a neutral oil like canola works fine for roasting, just use the good olive oil for the vinaigrette.
Ingredients:
- 2 lbs mixed root vegetables (carrots, parsnips, sweet potatoes), peeled and chopped into 1-inch pieces
- 2 tbsp olive oil
- Salt and freshly ground black pepper to taste
- For the Vinaigrette:
- 3 tbsp olive oil
- 1 tbsp apple cider vinegar or white wine vinegar
- 1 tbsp fresh lemon juice
- 1 clove garlic, minced
- 2 tbsp chopped fresh parsley or dill
- Pinch of red pepper flakes (optional)
Step-by-Step:
- Preheat your oven to 400°F (200°C).
- Toss the chopped root vegetables with 2 tablespoons of olive oil, salt, and pepper on a large baking sheet. Spread them in a single layer for even roasting.
- Roast for 30-40 minutes, turning once halfway through, until they’re tender and beautifully caramelized around the edges. The kitchen will fill with the most wonderful, earthy sweetness.
- While the vegetables roast, whisk together all the vinaigrette ingredients in a small bowl until well combined.
- Once the vegetables are out of the oven, drizzle them generously with the zesty vinaigrette and toss gently.
Sustainability/Leftover Tip: Any leftover roasted roots are fantastic tossed into a morning scramble or a quick lunch salad the next day.

The Ultimate Creamy Garlic & Chive Mashed Potatoes (Secret Shortcuts!)
Why It’s a Holiday Hero
Mashed potatoes are the undisputed comfort king of any holiday meal. My twist delivers incredible creaminess and flavor without a ton of butter or cream, making it lighter on the wallet and the palate, allowing other dishes to shine.
Smartly Savings: Ingredient Swaps & Stretching
Use russet or Yukon Gold potatoes for the best texture. If you don’t have fresh chives, a tablespoon of dried chives or even finely chopped green onion tops will work wonders. No garlic powder? Roast a whole head of garlic with your roots and squeeze out the soft cloves to mash in!
Ingredients:
- 3 lbs russet or Yukon Gold potatoes, peeled and cut into 1-inch chunks
- 4 cloves garlic, smashed
- 1/2 cup milk (any kind, dairy or non-dairy)
- 2 tbsp unsalted butter or a plant-based alternative
- 1/4 cup chopped fresh chives, plus more for garnish
- Salt and freshly ground black pepper to taste
Kitchen Reality Check: If your potatoes look a little gluey after mashing, don’t panic! It usually means you’ve over-mashed them or used too much liquid. A tiny splash of warm milk can sometimes loosen them up, but honestly, even slightly gluey mashed potatoes taste amazing with gravy!
Step-by-Step:
- Place the potato chunks and smashed garlic cloves in a large pot. Cover with cold water by about an inch. Add a generous pinch of salt.
- Bring to a boil, then reduce heat and simmer for 15-20 minutes, or until the potatoes are fork-tender.
- Drain the potatoes and garlic, reserving about 1/2 cup of the starchy cooking water. Return the potatoes and garlic to the empty hot pot over low heat for a minute or two, letting any excess moisture evaporate. This step is key for fluffy mash!
- Add the milk and butter to the pot. Using a potato masher, mash until smooth and creamy. If you prefer a looser consistency, gradually add a tablespoon or two of the reserved potato water.
- Stir in the chives, then season generously with salt and pepper. Taste and adjust. The aroma alone will make your mouth water!
Sustainability/Leftover Tip: Turn leftover mashed potatoes into crispy potato cakes by pan-frying them the next day; they make a fantastic breakfast or side dish.
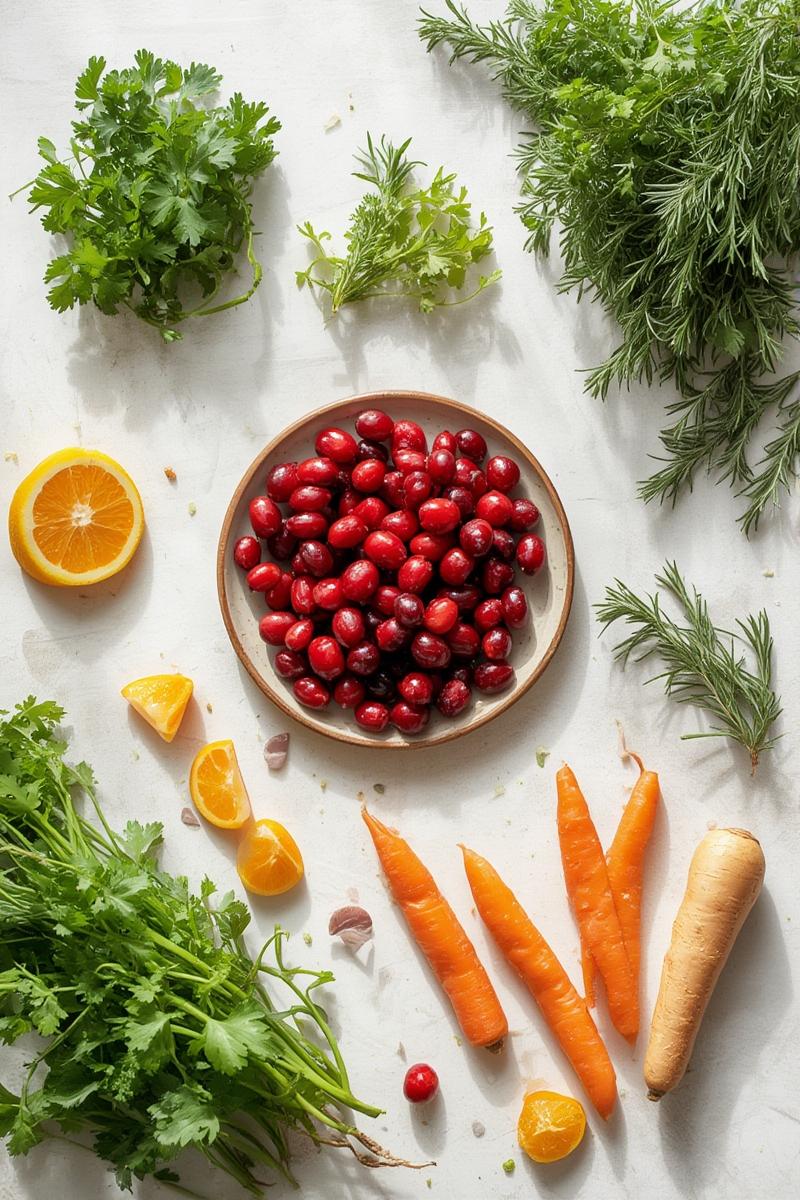
Smartly’s Speedy Spiced Cranberry & Orange Relish
Why It’s a Holiday Hero
Forget the wobbly canned stuff! Homemade cranberry relish is shockingly easy, incredibly flavorful, and costs a fraction of store-bought. This version adds a lovely spiced and citrusy kick that truly feels festive.
Smartly Savings: Ingredient Swaps & Stretching
Frozen cranberries work just as well as fresh, and are often cheaper year-round. No fresh orange? A teaspoon of orange zest and a splash of orange juice (from concentrate even!) will do. Play with your spices – a pinch of nutmeg or a whole star anise pod can add depth.
Ingredients:
- 12 oz (340g) fresh or frozen cranberries
- 1/2 cup granulated sugar (adjust to taste)
- 1/2 cup water or orange juice
- Zest and juice of 1 orange
- 1 cinnamon stick
- Pinch of ground cloves or allspice (optional)
Step-by-Step:
- Combine cranberries, sugar, water (or orange juice), orange zest and juice, cinnamon stick, and optional ground spices in a medium saucepan.
- Bring to a gentle boil over medium heat, stirring occasionally.
- Reduce heat to low and simmer for 10-15 minutes, or until most of the cranberries have burst and the sauce has thickened to your desired consistency. It will thicken more as it cools, filling your kitchen with a sweet, spicy perfume.
- Remove from heat and discard the cinnamon stick. Let cool completely before serving. The flavors really meld as it chills.
Sustainability/Leftover Tip: Leftover cranberry relish is amazing stirred into overnight oats or as a spread on toast or a turkey sandwich.
Hearty Herb & Onion Stuffing (From Pantry Staples)
Why It’s a Holiday Hero
Stuffing is pure comfort food, and this version uses simple, affordable ingredients to create a deeply savory, aromatic side that feels wonderfully homemade.
Smartly Savings: Ingredient Swaps & Stretching
Day-old bread is your best friend here – use any kind you have (sandwich bread, sourdough, French bread). Vegetable broth can easily replace chicken broth to make it vegetarian. Use whatever fresh herbs you have on hand, or a generous tablespoon of dried poultry seasoning.
Ingredients:
- 8 cups day-old bread, cut into 1-inch cubes
- 1/2 cup (1 stick) unsalted butter or plant-based alternative
- 1 large yellow onion, chopped
- 2 celery stalks, chopped
- 1/2 cup chopped fresh parsley
- 2 tbsp chopped fresh sage (or 1 tsp dried)
- 1 tsp dried thyme
- 1 tsp salt
- 1/2 tsp black pepper
- 2 cups chicken or vegetable broth (more if needed)
Step-by-Step:
- Preheat oven to 350°F (175°C). If your bread isn’t day-old, spread cubes on a baking sheet and bake for 10-15 minutes until lightly toasted and dry.
- In a large skillet, melt the butter over medium heat. Add onion and celery and cook until softened, about 8-10 minutes. The aroma will be incredible!
- Stir in the fresh parsley, sage, thyme, salt, and pepper. Cook for another minute until fragrant.
- In a large bowl, combine the bread cubes with the cooked onion and herb mixture.
- Gradually pour in the broth, tossing gently until the bread is moistened. You want it moist but not soggy.
- Transfer the stuffing to a 9×13 inch baking dish.
- Bake for 30-40 minutes, or until the top is golden brown and crispy.
Sustainability/Leftover Tip: Any leftover stuffing can be easily frozen and reheated, or crumble it into an omelet for a savory breakfast treat.
Crispy Green Bean Bake with Toasted Pecans
Why It’s a Holiday Hero
This is a fresh, vibrant take on a classic, skipping the canned soup for a simple scratch sauce that truly lets the green beans shine. It’s light, crunchy, and absolutely delicious.
Smartly Savings: Ingredient Swaps & Stretching
Frozen green beans work perfectly if fresh are pricey. Instead of pecans, use toasted breadcrumbs, sunflower seeds, or even crushed crispy fried onions for that satisfying crunch. A splash of cream or milk can replace half-and-half in the sauce for a lighter option.
Ingredients:
- 1.5 lbs fresh or frozen green beans, trimmed
- 2 tbsp unsalted butter or olive oil
- 1 small onion or 2 shallots, finely diced
- 2 cloves garlic, minced
- 1/4 cup all-purpose flour
- 2 cups milk (any kind) or half-and-half
- 1/2 tsp salt
- 1/4 tsp black pepper
- 1/2 cup toasted pecans, chopped
Step-by-Step:
- Preheat oven to 375°F (190°C).
- Blanch fresh green beans in boiling salted water for 3-5 minutes until tender-crisp. If using frozen, cook according to package directions. Drain well.
- In a large oven-safe skillet or pot, melt butter/olive oil over medium heat. Add onion/shallots and cook until softened, about 3-5 minutes. Add minced garlic and cook for another minute until fragrant.
- Sprinkle in the flour and whisk constantly for 1 minute to create a roux.
- Gradually whisk in the milk until smooth and thickened, about 3-5 minutes. Season with salt and pepper.
- Stir the blanched green beans into the creamy sauce.
- Top with toasted pecans. Bake for 15-20 minutes, or until bubbly and the pecans are lightly browned. The crispy topping adds such a wonderful contrast!
Sustainability/Leftover Tip: Any leftover green bean bake can be gently reheated in the oven, or quickly chopped and added to a frittata.
Sunshine Citrus & Arugula Salad (Budget Brightener)
Why It’s a Holiday Hero
Amidst all the rich holiday dishes, a bright, zesty salad is a welcome palate cleanser. This salad is incredibly simple, vibrant, and uses seasonal citrus which is often quite affordable.
Smartly Savings: Ingredient Swaps & Stretching
Arugula can be substituted with spinach or mixed greens. Use any combination of citrus you find on sale – oranges, mandarins, grapefruit segments. No red onion? Skip it! A handful of dried cranberries or pomegranate seeds (if on sale) can add a lovely touch without much cost.
Ingredients:
- 5 oz (140g) bag of fresh arugula
- 2 oranges, peeled and segmented (or 1 grapefruit)
- 1/4 small red onion, very thinly sliced
- For the Vinaigrette:
- 3 tbsp olive oil
- 1 tbsp white wine vinegar or apple cider vinegar
- 1 tsp Dijon mustard
- 1 tsp honey or maple syrup
- Salt and pepper to taste
Step-by-Step:
- In a small bowl, whisk together all vinaigrette ingredients until emulsified. Taste and adjust seasoning.
- In a large salad bowl, gently combine the arugula, citrus segments, and thinly sliced red onion.
- Just before serving, drizzle the vinaigrette over the salad and toss gently to coat. The simple, fresh flavors sing!
Sustainability/Leftover Tip: The vinaigrette can be stored in the fridge for up to a week; use it to dress other salads throughout the week.
Cheesy Corn Casserole: The Crowd-Pleasing Comfort
Why It’s a Holiday Hero
This casserole is a guaranteed crowd-pleaser, delivering warmth and cheesy goodness with minimal effort and a very friendly price tag. It’s wonderfully versatile and always disappears fast!
Smartly Savings: Ingredient Swaps & Stretching
Use canned corn (drained) for convenience and cost, or frozen corn. Any shredded cheese that melts well (cheddar, Monterey Jack, Colby) will work. Add a pinch of paprika or a dash of hot sauce if you like a little kick, using what you already have in the pantry.
Ingredients:
- 2 (15 oz) cans whole kernel corn, drained
- 1 (15 oz) can creamed corn
- 1 cup sour cream (or plain Greek yogurt for a lighter option)
- 1/2 cup milk
- 1/2 cup (1 stick) unsalted butter, melted
- 1 box (8.5 oz) corn muffin mix
- 1.5 cups shredded cheddar cheese, divided
Step-by-Step:
- Preheat oven to 350°F (175°C). Lightly grease a 9×13 inch baking dish.
- In a large bowl, combine the drained whole kernel corn, creamed corn, sour cream, milk, melted butter, and corn muffin mix. Mix until just combined – don’t overmix.
- Stir in 1 cup of the shredded cheddar cheese.
- Pour the mixture into the prepared baking dish.
- Sprinkle the remaining 1/2 cup of cheddar cheese over the top.
- Bake for 45-55 minutes, or until the casserole is set in the center and golden brown and bubbly around the edges. The bubbling cheese and sweet corn aroma is pure comfort!
Sustainability/Leftover Tip: Leftovers reheat beautifully in the microwave or oven, making for quick, satisfying lunches; try adding a fried egg on top for a full meal.
Sweet Potato & Apple Gratin (Savory-Sweet Simplicity)
Why It’s a Holiday Hero
This gratin offers a sophisticated yet incredibly easy side dish that balances savory and sweet notes beautifully. Layered sweet potatoes and apples look impressive but require minimal effort, using affordable seasonal produce.
Smartly Savings: Ingredient Swaps & Stretching
Use any firm, crisp apple variety you have on hand (Honeycrisp, Fuji, Gala). Instead of heavy cream, a mix of milk and a tablespoon of flour (to thicken) works just as well. A pinch of nutmeg or allspice can replace fresh thyme if you don’t have it.
Ingredients:
- 3 large sweet potatoes, peeled and thinly sliced (about 1/8 inch thick)
- 2 large apples (such as Honeycrisp or Fuji), peeled, cored, and thinly sliced
- 1 cup chicken or vegetable broth
- 1/2 cup heavy cream or half-and-half (or milk)
- 2 tbsp melted butter
- 1 tsp fresh thyme leaves, chopped (or 1/2 tsp dried)
- 1/2 tsp salt
- 1/4 tsp black pepper
Step-by-Step:
- Preheat oven to 375°F (190°C). Lightly butter a 9×13 inch baking dish.
- Arrange alternating layers of sweet potato and apple slices in the prepared dish, overlapping slightly. You’ll love seeing the vibrant layers come together.
- In a small bowl, whisk together the broth, cream, melted butter, thyme, salt, and pepper.
- Pour the liquid mixture evenly over the sweet potatoes and apples.
- Cover the dish tightly with foil and bake for 30 minutes.
- Remove the foil and bake for another 20-30 minutes, or until the sweet potatoes are tender and the top is lightly golden brown. The bubbling, aromatic goodness is a delight!
Sustainability/Leftover Tip: Leftover gratin makes a lovely breakfast alongside some sausages, or can be diced and added to a stir-fry.
Potluck & Party Prowess: General Tips for Seamless Sides
Bringing a dish to a potluck or serving a spread at home can be effortless with a few smart moves. It’s not just about the food; it’s about the experience!
Presentation Matters (Even on a Budget)
A little garnish goes a long way! Fresh herbs (a sprig of rosemary, a sprinkle of parsley or chives), a dash of paprika, a few toasted nuts, or a lemon wedge can transform a simple dish. Use your nicest serving platter if you’re taking it to a potluck, or a clean, simple bowl at home. Presentation adds to the joy of eating, and it doesn’t have to cost anything extra.
Smart Serving & Storage Solutions
For potlucks, consider dishes that travel well and can be served at room temperature or reheated easily. An insulated bag is your friend! For leftovers, invest in good airtight containers. I often prep my own overnight oats in jars, and the same principle applies to storing cooked sides efficiently for easy grab-and-go meals.
Don’t Forget the Dietary Needs (Easy Adaptations)
Many of these recipes are naturally flexible. For example, use vegetable broth for vegetarian options, or plant-based milk and butter for vegan guests. A simple note card indicating “vegetarian” or “gluten-free” (where applicable) is always a thoughtful touch for potlucks.
Embrace the Season: Your Smartly Holiday Starts Now
The magic of the holiday season isn’t found in elaborate, expensive dishes, but in the warmth of shared meals and good company. These budget-friendly, no-stress side dishes are designed to bring deliciousness and ease to your table, proving that truly wonderful food can be simple and accessible. So, go ahead, pick a recipe (or two!), get cozy in your kitchen, and infuse your holiday gatherings with love and flavor, without the usual hustle. I’d love to hear which of these Smartly twists you tried, or if you added your own unique spin!