

The quest for truly crispy side dishes on a busy weeknight often feels like a culinary challenge, balancing speed with that coveted crunch. This guide delivers a head-to-head comparison between oven-roasting and air frying, helping you achieve perfect texture and flavor with maximum efficiency. Discover which method best fits your kitchen and your schedule for ultimate weeknight success.
Introduction: The Quest for the Ultimate Crunch
I find myself utterly captivated by the sound of a perfectly crispy roast potato or a snappy green bean. That satisfying crunch isn’t just a texture; it’s a promise of deep flavor and pure culinary joy. On many a Tuesday evening, after a long day of recipe testing and writing, I crave that little bit of golden, crunchy magic alongside a simple protein. The real question, then, becomes: how do we achieve this ultimate crispiness without adding stress to an already packed schedule? I’ve spent countless hours in my kitchen, oven blazing and air fryer whirring, to figure out whether the classic oven or the speedy air fryer reigns supreme for crispy weeknight sides.
The Classic Crunch: Mastering Oven-Roasted Sides
There’s a reason oven-roasting has been a beloved technique for generations – it consistently delivers incredible depth of flavor and an unbeatable texture that develops slowly and beautifully. I remember my grandmother’s kitchen, always warm, always smelling of something wonderful bubbling or roasting away. For her, the oven was the heart of the home, transforming simple vegetables into golden, tender masterpieces.
The Art of the Maillard Reaction: How Ovens Crisp
The magic behind oven-roasted vegetables lies in something culinary scientists call the Maillard reaction. This isn’t just burning; it’s a complex chemical dance between amino acids and reducing sugars that happens at high temperatures, creating hundreds of new flavor compounds and that gorgeous golden-brown crust. It’s what gives roasted carrots their sweetness, and potatoes their nutty, earthy notes. The sustained, even heat of a conventional oven allows this reaction to unfold beautifully across a larger surface area, developing rich, complex flavors.
Best Veggies for Roasting & Essential Prep Tips (Oil, Spacing, Temp)
Almost any vegetable can be roasted, but some truly shine. Think sturdy root vegetables like potatoes, carrots, parsnips, and sweet potatoes. Broccoli, cauliflower, and Brussels sprouts also become incredibly delicious when roasted, with edges that caramelize and crisp up beautifully. My go-to prep tips are simple but crucial:
- Oil it Up: A good toss in olive oil (or avocado oil for higher smoke points) is essential. It helps conduct heat, preventing sticking and aiding in browning. Just enough to coat, not drench.
- Season Generously: Salt and freshly cracked black pepper are non-negotiable, but don’t stop there! Garlic powder, smoked paprika, herbs like rosemary or thyme, and even a pinch of chili flakes can elevate your dish.
- Give Them Space: This is perhaps the most important tip! Overcrowding your baking sheet is the archenemy of crispiness. Vegetables release moisture as they cook, and if they’re too close together, they’ll steam instead of roast. Use two baking sheets if needed, spreading your veggies in a single layer.
- High Heat is Your Friend: Most vegetables roast best at temperatures between 400°F and 425°F (200°C to 220°C). This high heat quickly evaporates surface moisture, allowing the Maillard reaction to kick in.
Time vs. Taste: What to Expect from Oven Roasting
Oven roasting generally takes longer than air frying, typically 20-40 minutes depending on the vegetable and how small you’ve cut it, plus preheating time. This longer cooking window, however, allows for deeper flavor development. You get a more consistent, all-over caramelization and a wonderfully tender interior. It’s a bit more hands-off once the pan is in, letting you attend to other parts of your meal, perhaps perfecting your chicken breast.
Oven Roasting: Pros & Cons for Busy Cooks
Pros:
- Excellent for larger batches, feeding a family or meal prepping.
- Develops deeper, more complex caramelized flavors.
- Relatively hands-off once in the oven.
- No special equipment beyond a baking sheet.
Cons:
- Longer preheat and cooking times.
- Heats up the kitchen, which isn’t always ideal in summer.
- Less efficient for very small portions.
Kitchen Reality Check: Oven Roasting
If your oven-roasted veggies aren’t coming out as crispy as you’d hoped, don’t panic! The most common culprit is usually overcrowding on the baking sheet. Remember, steam is the enemy of crisp! Give those lovely veggies room to breathe, and don’t be afraid to crank up the heat. Sometimes, a quick flip halfway through makes all the difference too. Even if a few pieces are a little softer than others, they’ll still taste amazing.
The Speedy Contender: Air Fryer Revolution
When air fryers first started popping up, I admit I was a bit skeptical. Another gadget? But my curiosity got the better of me, and I quickly became a convert for certain applications. For those busy weeknights when every minute counts, this appliance has proven to be a true game-changer for getting crispy sides on the table in a flash.
How the Air Fryer Works Its Magic for Crispiness
Think of an air fryer as a super-charged, countertop convection oven. It has a heating element and a powerful fan that circulates hot air rapidly around your food. This intense, concentrated blast of hot air mimics the effect of deep-frying, creating that irresistible crispy exterior with significantly less oil. It’s fantastic for anything you want to achieve a crisp texture on quickly, like reheating leftovers or making small batches of fries.
Air Frying for Maximum Crunch: Tips & Tricks
To get the most out of your air fryer, a few simple techniques can make all the difference:
- Don’t Overcrowd (Still!): Yes, it’s a smaller space, so it’s even more tempting to cram everything in. Resist! Air needs to circulate around every piece. Cook in batches if necessary.
- Shake and Toss: Halfway through cooking, give the basket a good shake or use tongs to toss the food. This ensures even exposure to the circulating hot air and uniform crisping.
- Light Oil is Key: While it uses less oil than deep frying, a light coating is still important for flavor and texture. A spray bottle works wonders for even distribution.
- Preheat for Best Results: Just like an oven, a preheated air fryer performs better. Give it about 5 minutes at your desired temperature before adding food.
Speed & Efficiency: Is the Air Fryer a True Game Changer?
Absolutely! The air fryer heats up incredibly fast – often in just 2-3 minutes – and cooks food at impressive speeds. For smaller portions of vegetables, you can typically go from raw to crispy in 10-20 minutes, which is a significant time saver compared to traditional oven roasting. This efficiency makes it a fantastic tool for getting dinner on the table faster, especially when you’re just cooking for one or two.
Air Frying: Pros & Cons for Busy Cooks
Pros:
- Extremely fast preheat and cook times.
- Achieves intense crispiness with very little oil.
- Does not heat up the whole kitchen.
- Ideal for small batches and quick re-crisping of leftovers.
Cons:
- Limited capacity, not ideal for large families or entertaining.
- Can dry out some foods if overcooked.
- Requires more active intervention (shaking/tossing).

Head-to-Head: Oven vs. Air Fryer Showdown
When it comes to deciding between the oven and the air fryer for crispy sides, it truly boils down to priorities: what kind of crisp are you after, how much time do you have, and how many people are you feeding? Both are fantastic tools, but they excel in different scenarios, making the air fryer vs. oven roasted veggies debate a fun one to dive into.
Crispy Texture: Who Delivers the Best Mouthfeel?
The oven tends to produce a drier, more evenly browned crisp, often with a slightly softer interior, especially for larger pieces. Think classic roasted potatoes with a flaky skin and creamy center. The air fryer, on the other hand, delivers a more intense, all-over crunch, often with a texture closer to deep-fried. If you’re looking for that satisfying, uniform crisp on every surface, the air fryer often wins for sheer intensity.
Flavor Development: A Nuanced Battle for Depth
Here’s where the oven often shines. The longer, more gentle heat of traditional roasting allows for a deeper, more complex caramelization and flavor development. Those rich, nutty, slightly sweet notes are pronounced. The air fryer, due to its speed, often yields a fresher, brighter flavor profile. It’s still delicious, but the deep, slow-cooked caramelization might be less apparent. For me, it’s a matter of what I’m pairing it with – some dishes call for that rich, roasted depth, others benefit from a lighter, quicker crisp.
Time & Convenience: The Weeknight MVP Crown
For sheer speed and convenience on a busy weeknight, the air fryer is often the MVP, especially if you’re making a side for one or two people. Its rapid preheat and cook times are unmatched. However, if you’re making a larger meal or want a hands-off approach after the initial prep, the oven can still be convenient. You load it up, set a timer, and mostly forget about it until it’s time to flip or remove. For very busy mornings, the logic is similar to why people might choose convenience like an overnight oats vs. quick oatmeal guide – it’s about optimizing for time.
Which Method Wins for YOU? (Considering batch size, type of food, desired outcome)
Choose the Oven if: You need to cook a large batch, desire deep, caramelized flavors, have a bit more time, or prefer a more hands-off cooking experience. It’s perfect for entertaining or meal prepping.
Choose the Air Fryer if: Speed is your top priority, you’re cooking for one or two, you want an intense, almost “fried” crisp, or you’re trying to use less oil. It’s fantastic for quick additions to a simple protein.
Crispy Side Dishes: Recipes for Both Methods
Let’s put theory into practice with some fantastic recipes that highlight the strengths of each method!
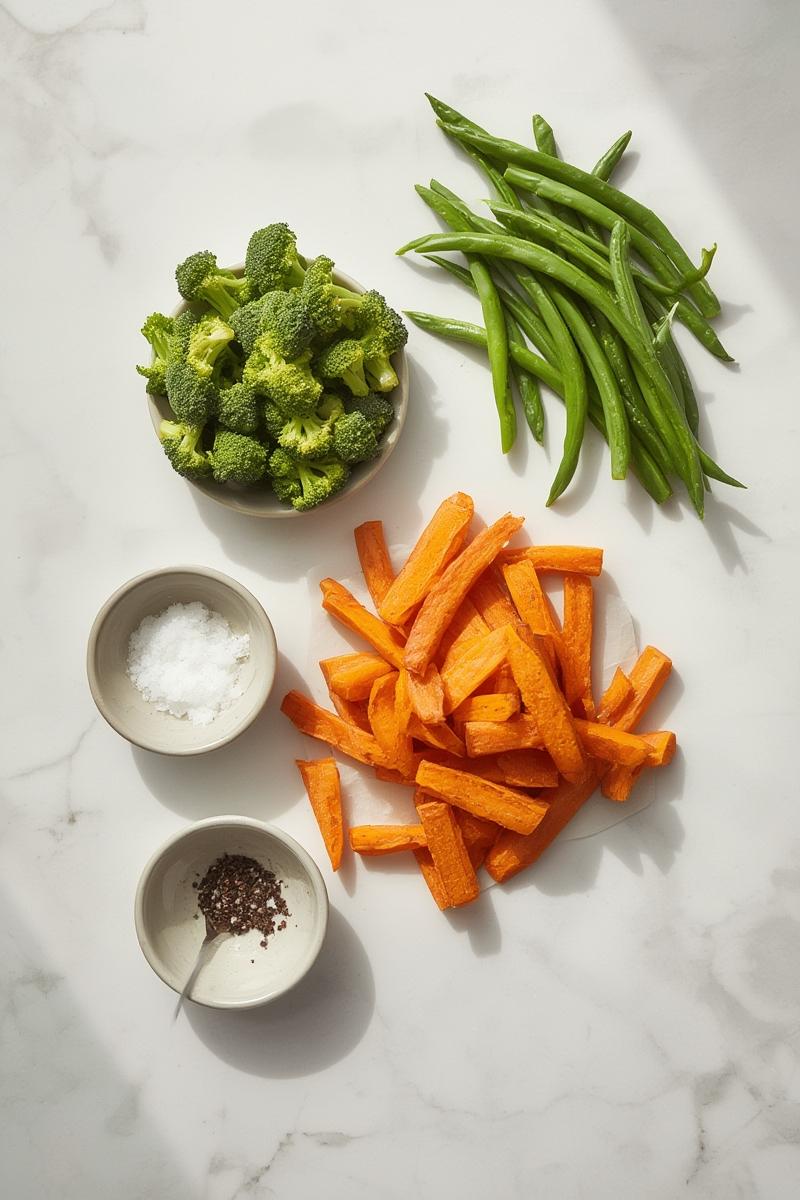
Garlic Parmesan Roasted Broccoli (Oven Method)
This is a side dish that makes regulars out of skeptics. The florets get beautifully tender-crisp, with savory garlic and salty Parmesan creating an irresistible crust. This is my go-to when I’m feeding a few people and want maximum flavor with minimal fuss.
Ingredients:
- 1 large head broccoli, cut into bite-sized florets
- 2 tablespoons olive oil
- 2 cloves garlic, minced
- 1/4 cup grated Parmesan cheese
- 1/2 teaspoon salt
- 1/4 teaspoon black pepper
- Optional: pinch of red pepper flakes
Market Note:
When selecting broccoli, look for tight, dark green florets and firm stalks. Yellowing florets indicate it’s past its prime. Sometimes, I grab a beautiful head from my local Polish market – their produce is always so fresh!
Instructions:
- Preheat your oven to 400°F (200°C). Line a large baking sheet with parchment paper for easy cleanup.
- In a large bowl, combine the broccoli florets, olive oil, minced garlic, salt, pepper, and red pepper flakes (if using). Toss until the broccoli is evenly coated.
- Spread the seasoned broccoli in a single layer on the prepared baking sheet. Remember, space is crucial for crispiness! If your baking sheet looks crowded, use two.
- Roast for 20-25 minutes, or until the broccoli is tender-crisp and the edges are slightly charred and fragrant. Give it a toss halfway through to ensure even cooking.
- Remove from the oven, sprinkle generously with Parmesan cheese, and toss gently. The residual heat will melt the cheese slightly, creating a delicious coating. Serve immediately.
Zesty Air-Fried Green Beans (Air Fryer Method)
These green beans are incredibly quick, vibrant, and packed with a bright, zesty flavor. They’re perfect when you need a speedy, healthy side that still brings the crunch.
Ingredients:
- 12 oz fresh green beans, trimmed
- 1 tablespoon olive oil
- 1/2 teaspoon garlic powder
- 1/4 teaspoon salt
- Pinch of black pepper
- Zest of 1/2 lemon (optional, but highly recommended for brightness)
Instructions:
- Preheat your air fryer to 375°F (190°C) for 3-5 minutes.
- In a medium bowl, toss the trimmed green beans with olive oil, garlic powder, salt, and pepper until evenly coated.
- Place the seasoned green beans in the air fryer basket in a single layer. You may need to cook in two batches, depending on the size of your air fryer.
- Air fry for 8-12 minutes, shaking the basket vigorously every 4 minutes, until the green beans are tender-crisp and slightly charred in spots. They should smell slightly nutty and sweet.
- Remove from the air fryer, transfer to a serving bowl, and toss with fresh lemon zest if desired. Enjoy immediately!
Sweet Potato Fries: A Dual Approach
Sweet potato fries are the ultimate test for crispy sides, as they can be notoriously difficult to get truly crunchy. Here’s how I approach them in both appliances for delicious results.
Ingredients:
- 2 medium sweet potatoes, peeled and cut into 1/4-inch thick fries
- 1 tablespoon olive oil
- 1 tablespoon cornstarch (my secret weapon for extra crispiness!)
- 1/2 teaspoon smoked paprika
- 1/2 teaspoon garlic powder
- 1/2 teaspoon salt
- 1/4 teaspoon black pepper
Instructions (Oven Method):
- Preheat oven to 425°F (220°C). Line two large baking sheets with parchment paper.
- In a large bowl, toss the sweet potato fries with olive oil, then sprinkle evenly with cornstarch, smoked paprika, garlic powder, salt, and pepper. Toss until well coated.
- Spread the fries in a single layer on the prepared baking sheets, ensuring they are not touching. This usually requires two sheets!
- Bake for 20 minutes, then flip the fries and rotate the baking sheets. Continue baking for another 15-20 minutes, or until golden brown and crispy. They should have a deep, earthy aroma when ready.
Instructions (Air Fryer Method):
- Preheat air fryer to 400°F (200°C) for 5 minutes.
- In a large bowl, toss the sweet potato fries with olive oil, then sprinkle evenly with cornstarch, smoked paprika, garlic powder, salt, and pepper. Toss until well coated.
- Place a single layer of fries in the air fryer basket (work in batches, likely 2-3).
- Air fry for 15-20 minutes, shaking the basket every 5 minutes, until the fries are deep golden brown and crispy.
Sustainability/Leftover Tip:
Don’t toss those sweet potato peels! They can be crisped up in the oven or air fryer with a little oil and salt for a fun, nutritious snack, or added to homemade veggie stock.
The Verdict: Your Weeknight Crispy Side Champion
So, which method truly wins the weeknight crispy side dish crown? The truth is, both the oven and the air fryer are champions in their own right, each bringing unique strengths to your kitchen. If you’re feeding a crowd or savoring a leisurely meal, the oven will grant you those deep, slow-developed flavors and a satisfyingly rustic crisp. But for those rapid-fire weeknights when time is short and you need that immediate, intense crunch for a single serving or small family, the air fryer undeniably swoops in as the ultimate speed demon.
Ultimately, the best method is the one that fits your current needs and brings you the most joy in the kitchen. Experiment, have fun, and enjoy the glorious crunch! I’d love to hear how you adapt these methods and what your favorite crispy side dishes are. Did you add your own twist?