
Table of Contents
Whisking Up Happiness: My Journey to the Perfect Gluten-Free Cake
Hello fellow food lovers! As someone who finds immense joy in bringing people together around delicious food, I’ve spent countless hours in my kitchen perfecting recipes that cater to everyone. There’s truly nothing more heartwarming than seeing friends and family gather, sharing stories, and savoring a treat made with love. And let me tell you, creating a truly spectacular gluten-free cake that rivals its traditional counterparts has been a delightful challenge and a rewarding journey. Over the years, I’ve lovingly refined numerous gluten-free dessert recipes, constantly seeking that perfect balance of texture and taste.
The primary question I often hear is, “How can I bake a delicious, moist, and foolproof gluten-free cake that tastes as good as a traditional cake?” My answer lies in understanding the nuances of gluten-free ingredients and embracing a few key techniques. This recipe is the culmination of my experiments, designed to give you a cake so good, so tender, and so utterly delectable, no one will guess it’s gluten-free! Get ready to bake a cake that’s a true celebration in every slice.
Understanding Your Gluten-Free Flour Blend: Essential Ingredients for a Successful Bake
Demystifying the core components is the first step to any great bake. When it comes to gluten-free baking, your choice of flour blend is paramount. Unlike wheat flour, which contains gluten for structure and elasticity, gluten-free blends require a careful mix of starches and alternative flours to achieve a similar result. I highly recommend using a high-quality “Gluten-Free 1:1 Baking Flour” that already contains xanthan gum. Xanthan gum acts as a binder, mimicking gluten’s ability to hold the cake together and prevent crumbling.
Beyond the flour, every ingredient plays a crucial role. Room temperature eggs, butter, and milk are non-negotiable – they emulsify better, creating a smoother batter and a finer crumb. Fats like butter or oil contribute to moisture, while leavening agents like baking powder and baking soda give your cake its beautiful lift. Even a pinch of salt enhances all the sweet flavors! To learn more about the science behind gluten-free baking, I often refer to authoritative resources like Wikipedia’s article on gluten-free diets. And if you’re curious about other ways to use your GF flour blend, my recipe for Amazing Gluten Free Bread is another fantastic way to explore its versatility!
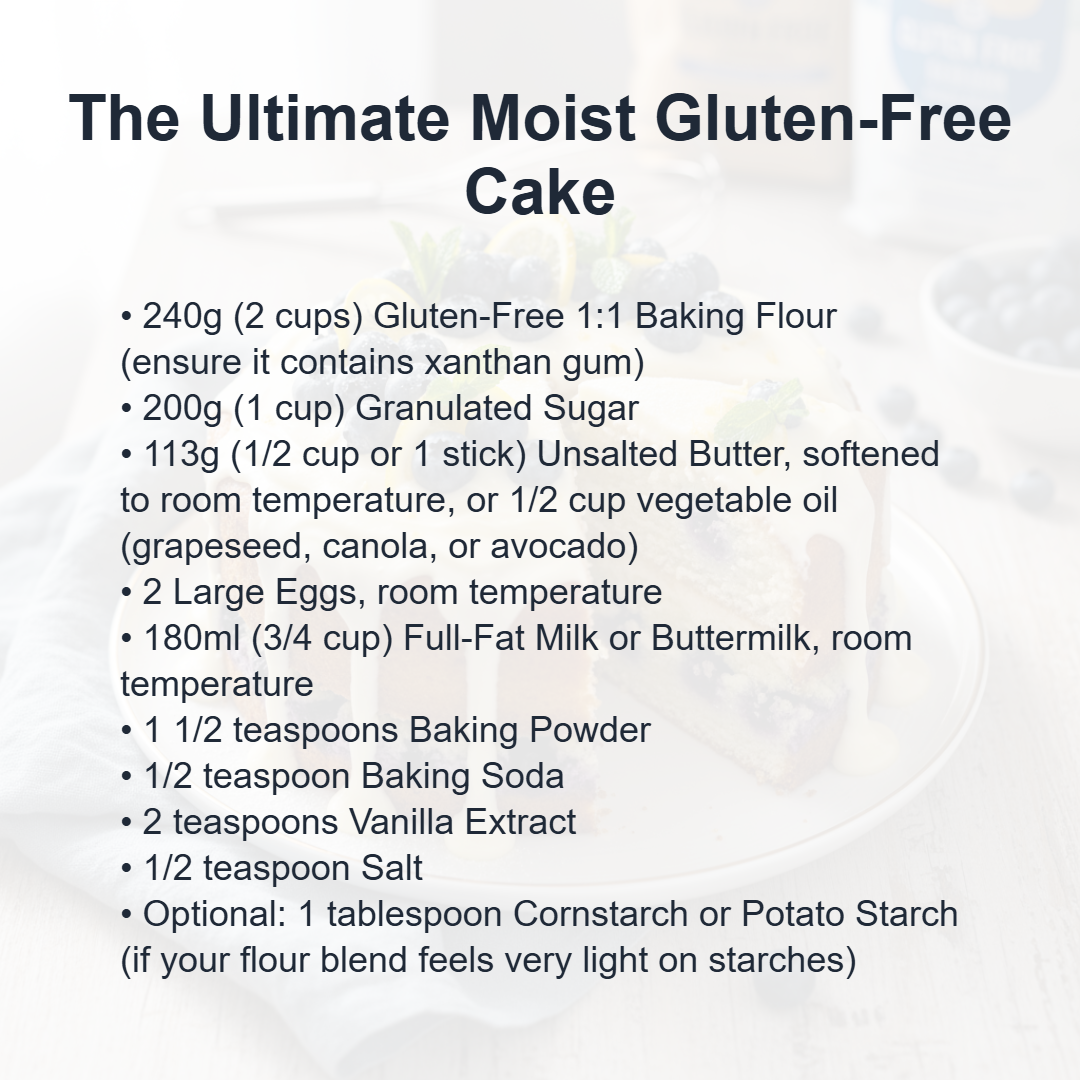
Ingredients
Yields: One 8-inch round cake or 12 cupcakes Prep time: 20 minutes Bake time: 30-35 minutes
For the Cake:
- 240g (2 cups) Gluten-Free 1:1 Baking Flour (ensure it contains xanthan gum)
- 200g (1 cup) Granulated Sugar
- 113g (1/2 cup or 1 stick) Unsalted Butter, softened to room temperature, or 1/2 cup vegetable oil (grapeseed, canola, or avocado)
- 2 Large Eggs, room temperature
- 180ml (3/4 cup) Full-Fat Milk or Buttermilk, room temperature
- 1 1/2 teaspoons Baking Powder
- 1/2 teaspoon Baking Soda
- 2 teaspoons Vanilla Extract
- 1/2 teaspoon Salt
- Optional: 1 tablespoon Cornstarch or Potato Starch (if your flour blend feels very light on starches)
For the Frosting (Basic Buttercream):
- 113g (1/2 cup or 1 stick) Unsalted Butter, softened
- 450g (3 1/2 cups) Powdered Sugar, sifted
- 2-3 tablespoons Milk or Cream
- 1 teaspoon Vanilla Extract
Mastering the Art of Gluten-Free Baking: Avoiding Common Pitfalls
Gluten-free baking doesn’t have to be daunting! It simply requires a slightly different approach than traditional baking. The unique characteristics of gluten-free flours mean they absorb liquid differently and can become gummy if overmixed, or dry if not enough moisture is present. The key here is gentle handling and precise measurements. I always recommend weighing your dry ingredients for the most consistent results, as volume measurements can vary wildly.
One common mistake is overmixing the batter. Unlike wheat flour, which can develop tougher gluten strands with overmixing, gluten-free flours can become dense and gummy. Mix until just combined! Another tip is to embrace room temperature ingredients, as mentioned earlier. This promotes a smooth, uniform batter, essential for an even bake. Just like with my Gluten Free Apple Fritters, patience and careful attention to detail will lead to delicious rewards!
Instructions
- Prepare for Baking: Preheat your oven to 350°F (175°C). Grease and flour an 8-inch round cake pan (or two 6-inch pans for a layered cake) with your gluten-free flour, or line the bottom with parchment paper. This step is crucial for easy release!
- Room Temperature Magic: Ensure all your cold ingredients (eggs, milk, butter) are at room temperature. This helps them combine smoothly and evenly.
- Combine Dry Ingredients: In a medium bowl, whisk together the gluten-free flour blend, granulated sugar, baking powder, baking soda, and salt. If using, add the optional cornstarch or potato starch here.
- Cream Wet Ingredients: In a large bowl, using an electric mixer, cream together the softened butter (or whisk the oil) and granulated sugar until the mixture is light and fluffy, about 2-3 minutes.
- Add Eggs and Vanilla: Beat in the large eggs one at a time, mixing well after each addition. Scrape down the sides of the bowl as needed. Stir in the vanilla extract until just combined.
- Alternate Wet and Dry: Gradually add the dry ingredients to the wet ingredients, alternating with the milk. Begin and end with the dry ingredients (e.g., 1/3 dry, 1/2 milk, 1/3 dry, 1/2 milk, 1/3 dry). Mix on low speed until just combined and no streaks of flour remain. Be very careful not to overmix!
- Bake: Pour the batter evenly into your prepared cake pan(s). Bake for 30-35 minutes, or until a wooden toothpick inserted into the center comes out clean or with a few moist crumbs attached. For cupcakes, bake for 20-25 minutes.
- Cool: Let the cakes cool in their pans on a wire rack for about 10-15 minutes. Then, carefully invert them onto the wire rack to cool completely before attempting to frost. Patience is key here – a warm cake will melt your frosting!
Secrets to a Perfectly Moist Gluten-Free Cake: Never Dry, Always Tender!
The pursuit of a perfectly moist gluten-free cake has been a passion of mine! The secret lies in a combination of smart ingredient choices and gentle handling. Firstly, using softened butter or a neutral oil ensures a tender crumb by adding richness and preventing dryness. Don’t skimp on the fat! Full-fat milk or buttermilk also adds an incredible boost of moisture and a lovely tang.
My top secret for supreme tenderness? Gentle mixing. As soon as those dry and wet ingredients come together, stop mixing! Overworking gluten-free batters develops a gummy texture, robbing your cake of that light, airy quality we all adore. Another small but mighty tip is ensuring all your ingredients are at room temperature. This creates a beautifully emulsified batter that bakes up evenly and holds onto moisture like a dream.
Troubleshooting Your Gluten-Free Cake: Conquering Dryness and Density
Even the most seasoned bakers face challenges, and gluten-free baking can sometimes feel like a puzzle. But don’t worry, I’ve got you covered with some common issues and their solutions:
- Why is my cake dry and crumbly? This is often due to too much flour or overbaking. Always weigh your flour for accuracy, and remember, oven temperatures can vary! Use an oven thermometer and start checking for doneness a few minutes before the recipe suggests. Another culprit can be not enough fat or liquid. Ensure your butter/oil and milk measurements are spot on.
- How can I prevent a gummy texture? Gummy texture usually signals overmixing. Once you add the flour, mix only until just combined. Also, too much xanthan gum can contribute to a gummy mouthfeel, so stick to a blend that already incorporates it without adding extra unless specifically called for.
- My cake is dense, not light and fluffy. This could be a combination of several factors: old or inactive leavening agents (baking powder/soda), ingredients not at room temperature, or once again, overmixing. Make sure your leaveners are fresh – test baking soda with vinegar or baking powder with hot water to ensure they bubble.
Remember, every oven is different, and a little observation and adjustment go a long way. Even if the cake looks a bit “wonky,” I promise it will still taste wonderful!
Personalizing Your Gluten-Free Cake: Creative Twists and Dietary Adaptations
This basic gluten-free cake recipe is a fantastic canvas for your creativity! Feel free to infuse it with different flavors to suit your mood or occasion.
- Lemon Lovers: Add 1 tablespoon of lemon zest and 2 tablespoons of fresh lemon juice to the batter. A lemon glaze (powdered sugar + lemon juice) would be divine!
- Chocolate Indulgence: Replace 1/4 cup of the gluten-free flour with unsweetened cocoa powder for a rich chocolate cake. Add chocolate chips to the batter for extra decadence.
- Spice It Up: Incorporate 1 teaspoon of ground cinnamon, 1/2 teaspoon of nutmeg, and a pinch of cloves for a warming spice cake, perfect for autumn.
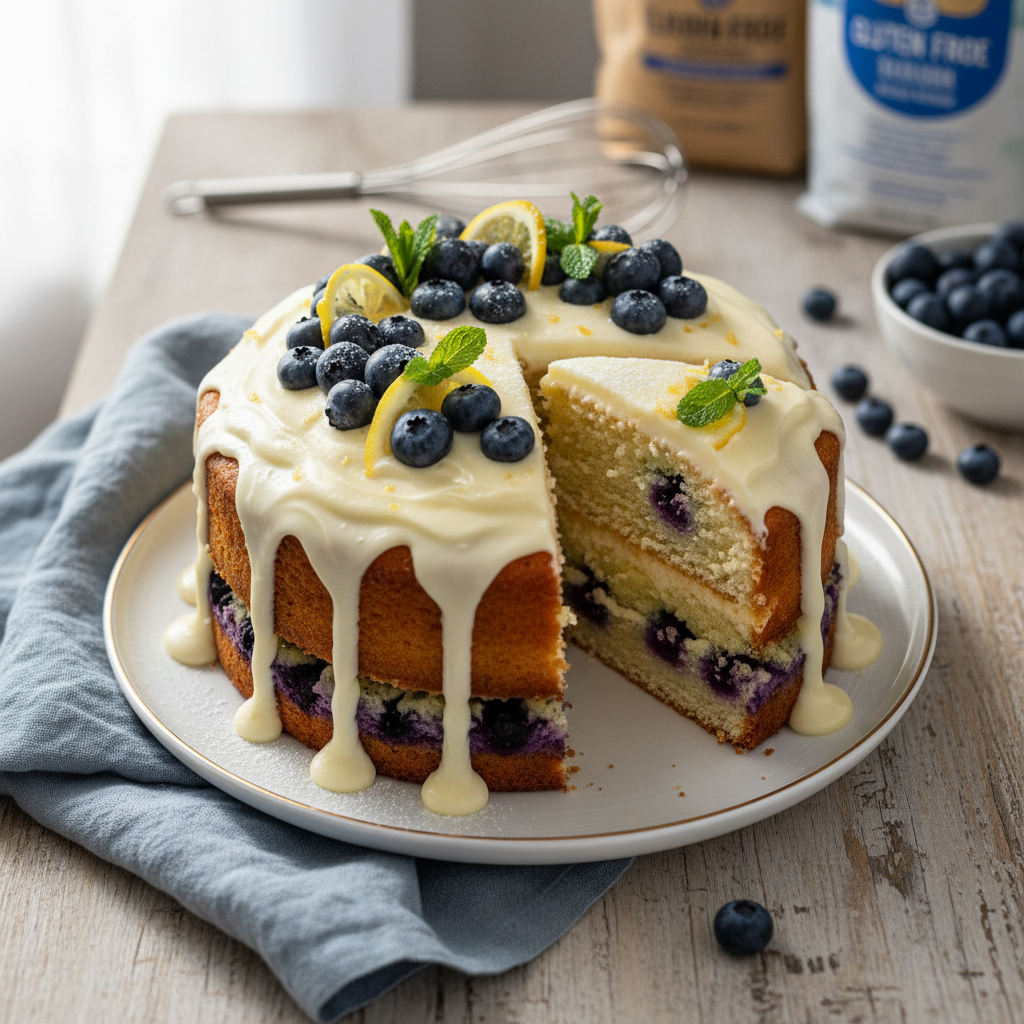
- Fruity Fun: Gently fold in 1/2 cup of fresh berries (blueberries, raspberries) or finely diced apples after mixing the batter.
- Dairy-Free Option: Substitute unsalted butter with a high-quality dairy-free butter alternative or simply use the vegetable oil option. For milk, use a plain, unsweetened non-dairy milk like almond, oat, or soy milk.
Don’t worry if you’re missing an ingredient—try what you have! Baking is all about improvisation sometimes. For more delightful gluten-free treats, you might enjoy my Vegan Gluten Free Pistachio Cookies for another allergy-friendly option.
Serving Up Joy: Presentation and Storage Tips for Your Homemade Delight
Presenting your homemade gluten-free cake is part of the joy! Once cooled and frosted, you can elevate its look with simple garnishes. A sprinkle of fresh berries, a dusting of powdered sugar, or some delicate chocolate shavings can make all the difference. I love capturing my recipe journeys with vibrant snapshots, and a beautifully plated slice always gets a photo!
To keep your cake fresh and delicious, store it properly. If unfrosted, wrap it tightly in plastic wrap at room temperature for up to 2 days, or in the refrigerator for up to 5 days. Frosted cakes should be stored in an airtight container at room temperature for up to 2-3 days, or in the refrigerator for up to 5 days. If refrigerating, let it come to room temperature for about 30 minutes before serving for the best texture and flavor. This simple storage tip ensures every slice is as delightful as the first.
Share the Gluten-Free Love!
I truly believe that food is a language of love, and there’s nothing quite like sharing a slice of homemade cake with those you cherish. From exploring local farmers’ markets for the freshest ingredients to experimenting with modern twists on classic recipes, every step of this culinary journey fills me with happiness. I hope this recipe inspires you to create beautiful moments and delicious memories in your own kitchen. Whether it’s for a birthday, a quiet afternoon tea, or just because, this gluten-free cake is sure to bring smiles.
Happy baking, my friends! I’d love to know if you added your own twist or if this became your new go-to gluten-free recipe. Share your creations with me – it makes my day!