

The Quest for the Ultimate Crispy Roast Potato
Achieving truly crispy roasted potatoes, especially when cooking for a crowd, often feels like an elusive culinary dream. Many home cooks struggle with potatoes that emerge from the oven sadly soggy, oily, or unevenly cooked, despite their best efforts. This guide reveals a simple, game-changing technique to achieve perfectly crispy, fluffy roasted potatoes for any size gathering, effortlessly, and completely gluten-free.
I remember the first time I hosted a big family dinner for my sister’s birthday. The main course was a delicious roast chicken, but I really wanted to nail the side dish. I pictured golden-brown, shattering-crisp potatoes, fluffy on the inside—the kind that makes everyone reach for seconds. What I got instead was a tray of rather sad, pale, and surprisingly soft spuds. The disappointment was real, and it kicked off my personal quest to solve the mystery of the perfectly crispy roast potato. Since then, I’ve experimented with countless methods, and what I’m sharing today is the culmination of all those trials and, yes, a few wonky batches!
The All-Too-Common Soggy Spud Syndrome
Picture this: you’ve meticulously peeled, chopped, and seasoned your potatoes. You’ve preheated the oven, the house smells promising, and you’re anticipating that glorious crunch. But then, you pull the tray out, and instead of a symphony of golden perfection, you're met with a lackluster, soft-centered, and often greasy mess. It's a common kitchen reality, and trust me, you're not alone if you've been there!
Why Most Roasted Potatoes Fall Flat (Literally)
The truth is, many traditional roasting methods overlook a few critical steps that are absolutely essential for maximum crispness. Often, it comes down to inadequate preparation of the potato surface, too much moisture, or insufficient heat distribution. We want that magical contrast: a shatteringly crisp exterior that gives way to a cloud-like, fluffy interior. It’s not just about throwing potatoes in a hot oven; it's about understanding what makes them sing.

The Smartly Secret: Our Game-Changing Technique
This isn't just a recipe; it's an improvisation born from countless kitchen experiments. The "Smartly Secret" is all about creating the ideal conditions for crisping, from the inside out. It's a straightforward process that makes daunting dishes feel simple, ensuring every potato on your plate is a crispy triumph. This method ensures a perfectly gluten-free side every time, making it ideal for inclusive meals.
Step 1: The Right Cut & Pre-Boil Prep (It's All About Surface Area!)
The journey to crispy perfection begins even before the oven is on. How you cut your potatoes matters immensely. I love using a sturdy chef's knife for this; it makes quick work of even larger spuds. We're aiming for pieces that are roughly 1.5 to 2 inches in size. This isn't just for even cooking; it's about maximizing surface area. More surface area means more crunchy bits! A quick pre-boil in salted water is critical here. This step starts to cook the potato through and, more importantly, roughens up the exterior starch.
Step 2: The 'Rough Up' Method for Max Crunch
This is arguably the most fun—and most crucial—step. After pre-boiling and draining, we're going to give those potatoes a good shake! Transfer the drained potatoes back into the empty pot they boiled in, put the lid on, and shake vigorously for 30-60 seconds. You’ll hear them thumping and tumbling. What you're doing here is intentionally creating a fluffy, almost mashed-potato-like texture on the surface of each chunk. This starchy, roughed-up layer is what will transform into that incredible, shattering crust when roasted. Don't be gentle; really get in there!
Step 3: High Heat & Strategic Spacing (No Crowding Allowed!)
For crispiness, heat is your friend, but so is space. Roasting at a high temperature (we’re talking 400-425°F / 200-220°C) is key for developing that golden-brown crust. However, if your potatoes are crowded on the baking sheet, they'll steam instead of roast, leading to that dreaded sogginess. Use two baking sheets if necessary; give each potato its personal space. I always make sure my baking sheets are generously oiled and preheated in the oven before the potatoes even touch them. This creates an instant sizzle and helps prevent sticking.
Step 4: The Flavor Boost: Seasoning & Fat Choices
While the technique does most of the heavy lifting for texture, the right seasoning elevates the entire experience. I'm a big fan of flaky sea salt, freshly cracked black pepper, garlic powder, and sometimes a hint of smoked paprika. For fat, extra virgin olive oil is a classic, but for an even crispier result with a richer flavor, I often turn to duck fat or beef tallow, especially when serving these alongside a hearty dish like our High-Protein Creamy Beef Pasta. The higher smoke point of these fats also contributes to better browning.
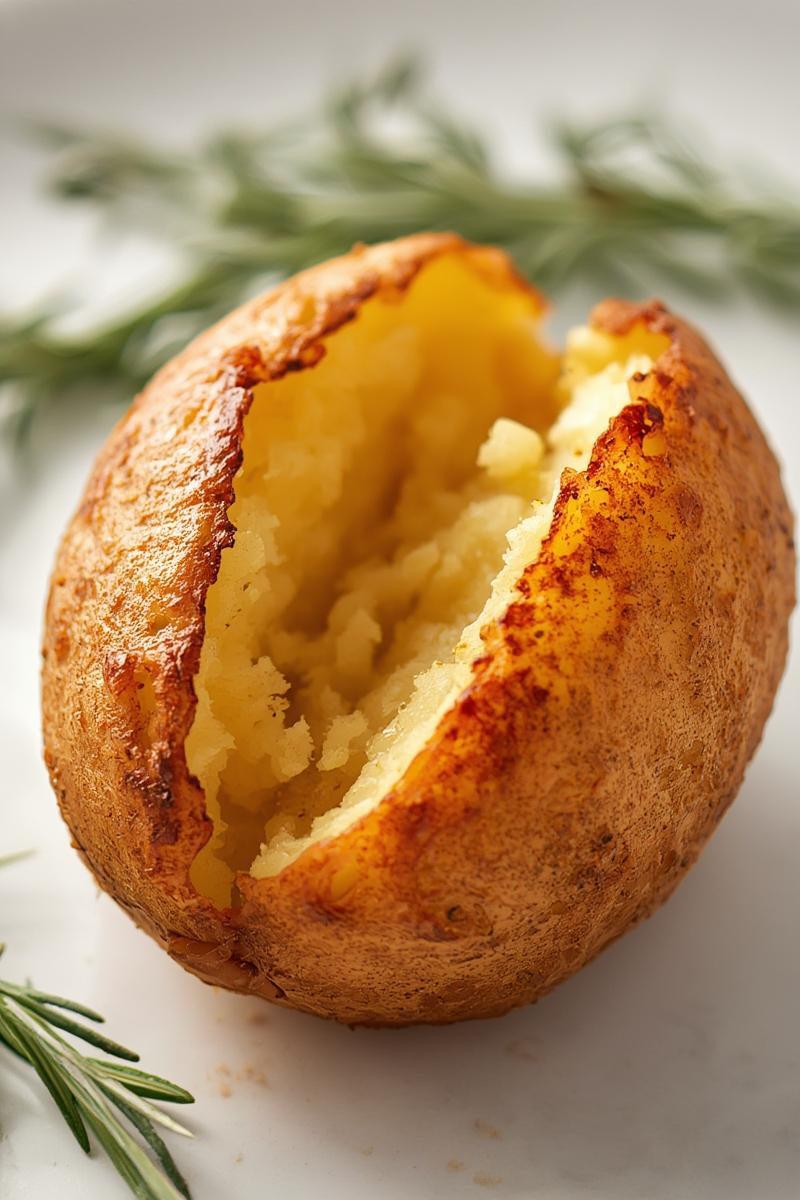
The Science Behind the Crunch: Why This Hack Works
Understanding a little bit of the 'why' can really make you feel like a kitchen wizard. It’s not magic; it’s simple science working in your favor!
Starch Release & Gelatinization Explained
When you pre-boil the potatoes, the heat causes the starch granules within them to absorb water and swell, a process called gelatinization. When you rough up the par-boiled potatoes, this action breaks down the surface cells, releasing those swollen, gelatinized starches. This creates a starchy slurry on the exterior, which, when exposed to high heat, dries out and forms a magnificent, crispy crust.
Maximizing Maillard Reaction for Golden Perfection
The Maillard reaction is the chemical reaction responsible for the browning and delicious savory flavors in many cooked foods, including our potatoes. High heat, combined with a dry, starchy surface, accelerates this reaction. The sugars and amino acids on the potato’s exterior react and caramelize, producing hundreds of new flavor compounds and that irresistible golden-brown color we all crave.
Steam Management: The Enemy of Crispy
Any moisture lingering around your potatoes in the oven is the archnemesis of crispiness. When potatoes are crowded or not prepped correctly, they release steam, which gets trapped and prevents the surface from drying out and crisping. Our method, with the pre-boil and roughing up, removes excess surface moisture, and the strategic spacing in the oven ensures steam can escape freely, allowing the potatoes to roast, not steam.
Your Ultimate Crispy Roasted Potatoes Recipe (Gluten-Free!)
This recipe is designed to deliver that glorious crispy roasted potato experience consistently, even if you’re making a huge batch for a get-together. It’s naturally gluten-free and endlessly adaptable.
Ingredients for a Crowd-Pleasing Batch
- 3 lbs (about 1.5 kg) russet, Yukon Gold, or King Edward potatoes, peeled and cut into 1.5-2 inch pieces
- 2 tablespoons coarse sea salt (for boiling water, adjust as needed)
- 1/4 cup olive oil, duck fat, or beef tallow
- 1 teaspoon garlic powder
- 1 teaspoon onion powder
- 1/2 teaspoon smoked paprika (optional, but lovely!)
- Flaky sea salt and freshly cracked black pepper, to taste
- Fresh rosemary or thyme sprigs (optional, for roasting)
Market Notes:
For the potatoes, I lean towards russets for their high starch content, which helps with that fluffy interior and crispy exterior. Yukon Golds are also fantastic if you prefer a slightly creamier texture. Always look for firm, blemish-free potatoes, avoiding any with green spots.
The Smartly Method: Step-by-Step Instructions
- Preheat & Prep: Preheat your oven to 425°F (220°C). Place your chosen fat (olive oil, duck fat, or tallow) onto two large baking sheets and place them in the oven to preheat for at least 10-15 minutes. This creates an instantly hot surface for better crisping.
- Boil & Soften: Place the cut potatoes into a large pot. Cover with cold water by about an inch. Add 2 tablespoons of coarse sea salt. Bring to a rolling boil and cook for 8-10 minutes, or until the edges of the potatoes are just starting to look translucent and fork-tender, but not falling apart. Don't overcook them!
- Drain & Rough Up: Carefully drain the potatoes completely in a colander. Return the drained potatoes to the empty, dry pot. Place the lid on tightly and shake the pot vigorously for 30-60 seconds. You want to see the edges roughed up and a starchy "fluff" forming on the surface. This is the secret!
- Season & Coat: Carefully remove the hot baking sheets from the oven. Evenly distribute the roughed-up potatoes onto the hot sheets, ensuring they are in a single layer and not crowded. Drizzle with the remaining olive oil (if using) or ensure they are well coated by the melted fat. Sprinkle with garlic powder, onion powder, smoked paprika (if using), flaky sea salt, and black pepper. Toss gently to coat.
- Roast to Perfection: Return the baking sheets to the hot oven. Roast for 20 minutes, then flip the potatoes. Continue to roast for another 20-30 minutes, or until deep golden brown and incredibly crispy all over. For extra flavor, you can toss in a few sprigs of fresh rosemary or thyme during the last 15 minutes.
- Serve Immediately: Remove from the oven and serve hot. A final sprinkle of flaky sea salt never hurts! These are wonderful served alongside a robust main, perhaps even complementing a rich Creamy Parmesan Garlic Beef Bowtie Pasta.
Pro Tips for Next-Level Crispiness
- Don't skimp on fat: While you don't want them swimming, enough fat ensures even heat transfer and crisping.
- Avoid overcrowding: This is a cardinal rule. If you have too many potatoes, use multiple trays.
- Flip once: Resist the urge to constantly flip. Let them develop a crust on one side before turning.
- Listen: A truly crispy potato will make a satisfying crunching sound when gently poked with tongs.
Kitchen Reality Check:
If your potatoes look a bit shaggy after the rough-up, don't panic! That's exactly what we want. It might seem like you’re breaking them apart, but that starchy exterior is your friend. If they don’t seem to be browning enough, don't be afraid to crank up the heat for the last 10 minutes or switch to the broiler for a quick blast, but watch them like a hawk to prevent burning!
Beyond Basic: Flavor Variations & Serving Suggestions
Once you’ve mastered the crispy technique, the world of flavor is your oyster. Don't be afraid to experiment with what's in your spice cabinet!
Herb & Garlic Infusions
Add finely minced fresh garlic or dried herbs like oregano, basil, or Italian seasoning along with the garlic powder and onion powder. Toss with the oil before roasting. Fresh herbs like rosemary and thyme are best added about halfway through roasting so they don't burn.
Spicy Kick: Paprika & Chili Flakes
For a touch of heat, sprinkle in some cayenne pepper or a generous pinch of red chili flakes with the other seasonings. A good quality smoked paprika also adds wonderful depth and color.
Cheese & Rosemary Upgrade
During the last 10 minutes of roasting, sprinkle freshly grated Parmesan cheese over the potatoes. It will melt and crisp up beautifully, adding a salty, savory layer. A final flourish of fresh rosemary pairs wonderfully here.
Perfect Pairings for Any Meal
These crispy potatoes are incredibly versatile. They’re a fantastic side for roasted meats, grilled chicken, a simple weeknight fish, or even a hearty breakfast scramble. They’re also perfect for soaking up the delicious pan juices from a roast, making them a staple at my family gatherings.
Say Goodbye to Soggy: Troubleshooting & FAQs
"My potatoes aren't browning!" (Common Issues)
The most common culprits are: oven temperature too low, baking sheet not preheated, or overcrowding. Make sure your oven is truly at temperature (an oven thermometer helps!). Always preheat your sheets with the fat. And crucially, give those potatoes space! If they're still stubborn, give them an extra 10-15 minutes, or a quick blast under the broiler (again, watch closely!).
"Can I make these ahead?" (Prep & Storage Tips)
While best served fresh, you can par-boil and rough up the potatoes a few hours ahead of time. Store them uncovered in the fridge on a clean kitchen towel to ensure they stay dry. This actually helps them crisp up even more! Reheating is best done in a hot oven (400°F/200°C) for 10-15 minutes until revived.
"What potato varieties work best?"
Starchy potatoes like Russets are excellent for maximum fluffiness and crispiness. Yukon Golds offer a slightly creamier interior while still crisping well. Red potatoes or new potatoes can work, but they tend to be waxier and may not achieve the same level of internal fluffiness, though they will still crisp up beautifully on the outside.
Leftover roasted potatoes make an incredible breakfast hash the next morning! Just chop them up and fry them with some onions and peppers until heated through.
I genuinely hope this secret technique transforms your roasted potato game as it has mine. There’s such a simple joy in serving a dish that's consistently delicious and perfectly textured. I’d love to know what seasonings you add to your crispy roasted potatoes, or if you discovered a new favorite twist!