

Tackling crumbly gluten-free baked goods can feel like a culinary puzzle, leaving you with a delicious taste but a frustrating texture. This comprehensive guide acts as your ‘rescue mission,’ dissecting the common causes of crumbly textures, offering immediate fixes for current batches, and providing actionable preventative strategies for perfect, cohesive results every time.
Table of Contents
The Lingering Question: Why Do GF Bakes Crumble?
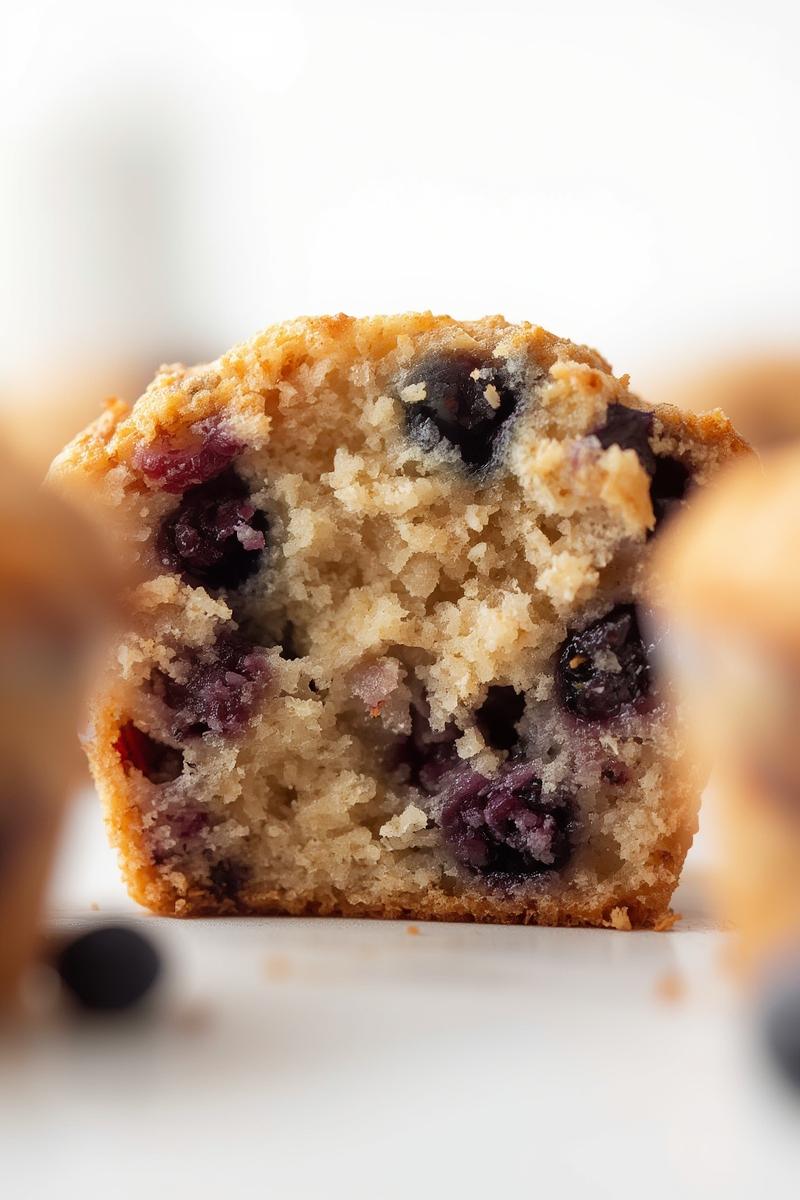
I still remember the Great Lemon Muffin Incident of last spring. The aroma from the oven was heavenly, promising sunshine in every bite. But when I pulled them out, cooled them, and tried to pluck one from the tin, it disintegrated into a mound of zesty, buttery crumbs right in my hand. It was a familiar frustration for anyone who loves gluten-free baking: the magnificent scent, the delightful flavor, but the disappointing lack of structural integrity. It feels like a betrayal when your beautifully planned bake just falls apart!
The Gluten Gap: What’s Missing
The fundamental difference, of course, lies in the absence of gluten. In traditional baking, gluten, a protein found in wheat, acts like a microscopic elastic network. It gives dough and batter their stretch, strength, and chewiness, trapping gases from leavening agents to create that wonderful airy structure we adore. Without it, we’re essentially asking a collection of individual grains and starches to hold hands and form a sturdy bond, which they’re not naturally inclined to do.
Common Symptoms of Crumbly Catastrophes
You know you’ve got a crumbly catastrophe on your hands when your cookies spread too much and crumble when picked up, your muffins fall apart at the touch, or your bread resembles dense, dry sawdust. It’s not just about the bake literally falling apart; sometimes it’s a dryness, a lack of chew, or simply a texture that feels more like sand than cake.
Decoding the Disaster: Common Culprits Behind Crumbly GF Bakes
When I first started experimenting with gluten-free baking for friends with sensitivities, it felt like I was constantly playing detective. Was it the flour? The oven? My own impatience? I’ve learned that there are a few usual suspects behind those frustratingly crumbly results.
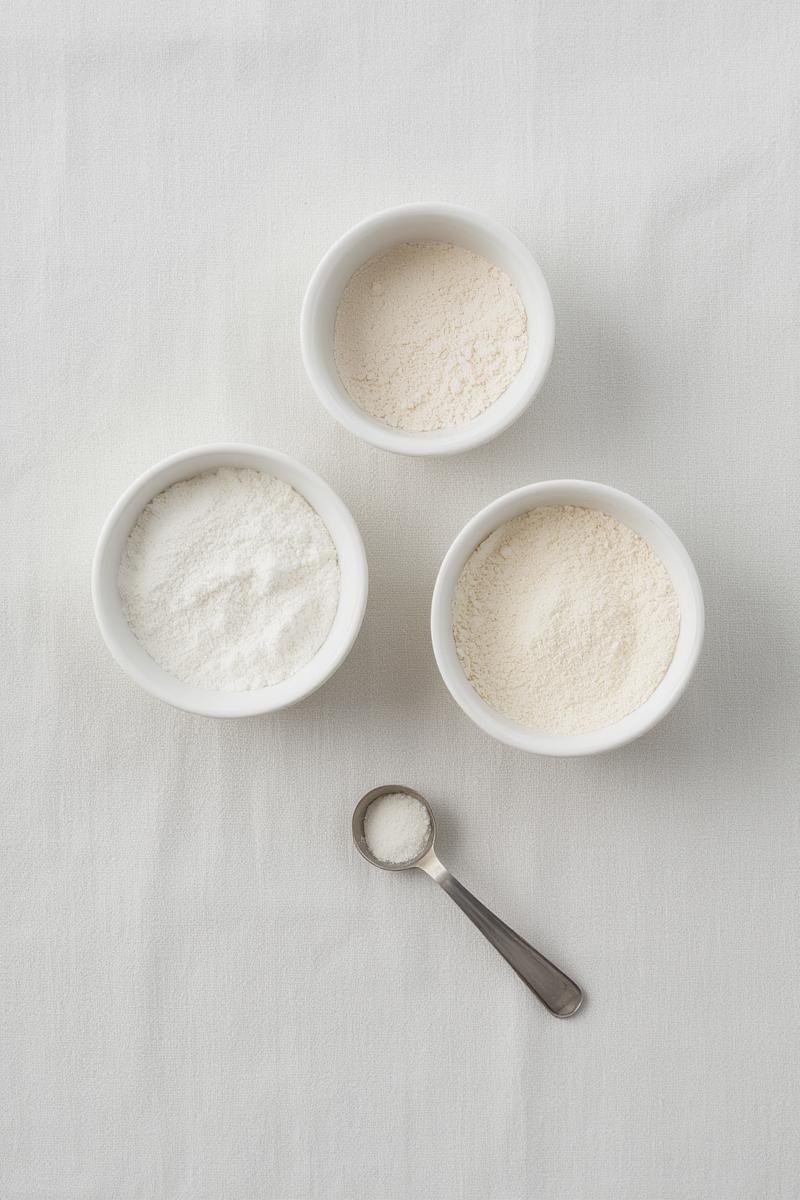
The Flour Blend Fiasco: Getting Ratios Right
This is often the biggest culprit! Gluten-free baking isn’t just a matter of swapping wheat flour for one type of GF flour. Most single GF flours lack the balanced properties needed for a good bake. Rice flour can be gritty, almond flour too dense, tapioca flour too gummy. The magic happens in the blend. You need a mix of protein-rich flours (like almond or sorghum), starchy flours (like tapioca or potato starch), and often a lighter flour (like white rice flour) to mimic the multifaceted role of wheat.
Hydration Hurdles: Too Dry or Too Wet?
Gluten-free flours absorb liquid differently than wheat flour, and often require more of it. If your dough or batter is too dry, it simply doesn’t have enough moisture to bind everything together, leading to a crumbly mess. On the flip side, too much liquid can lead to a gummy texture that still crumbles because it lacks structure. It’s a delicate balance, and sometimes even a tablespoon more or less can make a significant difference. Just like rescuing dry chicken breast needs a splash of broth, GF bakes need their perfect moisture level!
Binder Blunders: The Role of Xanthan Gum & Alternatives
Since there’s no gluten, we need to add a binder to create that essential elasticity and structure. Xanthan gum is the most common and effective, but psyllium husk powder, ground flaxseed, or chia seeds can also be used. Too little binder, and your bakes will be crumbly. Too much, and they can become gummy or dense. Getting the right amount for your specific flour blend and recipe is key.
Overbaking & Temperature Tweaks
Oh, the silent killer of many a potential masterpiece! Overbaking is a huge culprit for dry, crumbly gluten-free bakes. Because GF items can dry out quickly, even a few extra minutes in the oven can suck out all the precious moisture. Always check for doneness at the minimum bake time. Also, oven temperatures can vary wildly from what the dial says, so an oven thermometer is your best friend!
Mixing Method & Cooling Catastrophes
Unlike wheat doughs that benefit from extensive kneading, GF batters usually prefer minimal mixing once the dry and wet ingredients are combined. Overmixing can develop toughness or activate starches too much, leading to a breakdown in texture. And then there’s cooling! Allowing your bakes to cool completely in the pan or on a wire rack is crucial. Cutting into hot GF bread or cake can cause it to collapse or crumble, as its structure hasn’t fully set.
Your Emergency Toolkit: Rescuing a Crumbly Batch
Even if you’re holding what looks like a pile of expensive crumbs, don’t despair! I’ve been there, staring at a crumbly cake, wondering if I should just pretend it was meant to be a deconstructed dessert. There are often ways to salvage or creatively transform your efforts.
Hydration Heroics: Reintroducing Moisture
For slightly dry but still somewhat intact bakes (like muffins or cake slices), you can try reintroducing moisture. A simple syrup (equal parts sugar and water, simmered until sugar dissolves, then cooled) brushed over the surface can work wonders. Glazes made with powdered sugar and lemon juice or milk also add moisture and flavor. For something like quick bread, a light drizzle of honey or maple syrup while it’s still warm can help it absorb moisture and become more tender.
Reinventing the Crumbles: Delicious Salvage Ideas
This is where improvisation truly shines! If your gluten-free cake, brownies, or cookies have completely crumbled, they are still absolutely delicious! Think trifles, parfaits, or even pie crusts. Layer the crumbs with whipped cream, fresh fruit, or pudding for an elegant dessert. You can even mix them with a little melted butter and press them into a pan for a ready-made crust for a no-bake cheesecake or a fruit crisp topping. This often leads to some of my most unexpectedly delicious creations, much like how a simple ingredient swap can make an instant classic like sticky beef noodles a personal favorite.
Adding Structural Support Post-Bake
For items that are a bit too delicate, a good frosting or ganache can act as a delicious edible glue, holding everything together. A sturdy buttercream can support a cake that’s threatening to fall apart, and chocolate ganache can bind crumbling brownies into a rich, decadent treat. Even a drizzle of melted chocolate or a dusting of powdered sugar can help hold delicate cookies together and disguise minor imperfections.
Bake-Proofing for Success: Preventing Future Crumbly Calamities
The best rescue mission is the one you don’t need! Over time, I’ve developed a few habits that help me achieve reliably cohesive and delicious gluten-free results.
Crafting Your Perfect GF Flour Blend
Instead of relying on single flours, try creating your own blend or purchasing a reputable commercial “all-purpose” gluten-free blend that explicitly states it’s for baking (and ideally contains xanthan gum). A good general homemade blend I often recommend is 40% whole grain flour (brown rice, sorghum, oat), 30% starch (tapioca, potato, cornstarch), and 30% lighter flour (white rice, millet). Don’t be afraid to experiment! Your local farmers’ market often has small bags of less common flours like buckwheat or teff; grab a little to play with.
The Art of Accurate Measurement & Hydration
Baking is a science, and even more so with gluten-free flours. Invest in a kitchen scale. Measuring by weight is far more accurate than by volume, especially for flours that can pack down differently. For liquids, always measure precisely. If a batter seems too thick or dry, don’t be afraid to add an extra tablespoon of liquid (milk, water, applesauce) until it reaches a consistency similar to its gluten-full counterpart. It’s all about trusting your instincts, but having a solid starting point makes all the difference.
Binder Best Practices
If your chosen GF flour blend doesn’t include xanthan gum, add it! A general rule of thumb is 1/4 teaspoon per cup of GF flour for cookies, 1/2 teaspoon per cup for cakes/muffins, and 3/4 to 1 teaspoon per cup for breads. If you prefer not to use xanthan gum, ground psyllium husk (about 1.5-2 teaspoons per cup of flour) or finely ground flax/chia “eggs” (1 tbsp ground seed + 3 tbsp water, let sit for 5 mins per egg) are excellent natural alternatives that add structure and moisture, making dishes like Marry Me Tortellini seem effortless.
Mastering Oven Temperature & Timing
Always preheat your oven fully. A consistent temperature from the start is essential. As I mentioned, an oven thermometer is non-negotiable. Begin checking for doneness at the lowest recommended bake time. Look for visual cues: golden-brown edges, a toothpick inserted coming out clean (or with moist crumbs for brownies), and a springy texture when gently pressed. Err on the side of slightly underbaked rather than overbaked, especially with cakes and muffins. And remember, the residual heat in the pan will continue to cook the item for a few minutes after it’s out of the oven.
Gentle Handling & Patient Cooling
Once your gluten-free masterpiece is out of the oven, treat it with care. Let it cool in the pan for the time specified in the recipe, then transfer gently to a wire rack to cool completely. This crucial cooling time allows the structure to set and any residual moisture to redistribute, preventing that dreaded crumble. Don’t rush it!
To avoid waste, any small remnants from crumbly bakes can be pulsed with nuts and dates for a quick energy bite mixture.
Beyond the Crumbs: Your Journey to GF Baking Confidence
Embrace Experimentation
Gluten-free baking is a continuous learning adventure. Every flour blend is a little different, every oven has its quirks, and every new recipe offers a chance to grow. Don’t be afraid to tweak recipes based on your experience. Did it seem a little dry last time? Add a tablespoon more liquid. A bit dense? Try an extra pinch of baking powder. It’s all about iterative improvement.
Trust Your Senses
Ultimately, the best guide is you. Feel the batter, smell the baking, observe the changes in the oven. Does the dough feel too stiff? Is the cake browning too quickly? Listen to your intuition and make adjustments. The more you bake, the more attuned you’ll become to what “feels right.”
I truly hope this guide helps you conquer those crumbly gluten-free bakes and find joy in creating wonderfully cohesive, delicious treats. Remember, every “mishap” is just a step towards mastery! I’d love to know what gluten-free creation you’re working on next, and if you added your own twist to prevent or rescue a batch!